


How to Build a Telegram Trading Bot for Solana
How to Build a Telegram Trading Bot for Solana: A Beginner’s Step-by-Step Guide
In this tutorial, you’ll learn how to create your very own Telegram trading bot for Solana using Visual Studio Code, BotFather, and a few essential tools.
This guide is perfect for beginners who want to set up a trading bot and promote it in their community.
Table of Contents
1. Install Visual Studio Code and Python
Before you start coding, make sure you have Visual Studio Code (VSCode) installed on your computer. VSCode is a free, powerful code editor with excellent Python support.
Download VSCode: Visit https://code.visualstudio.com/ and download the latest version for your operating system.
Install Python: Download and install Python from https://www.python.org/downloads/. Remember to select “Add Python to PATH” during installation.

2. Create Your Telegram Bot with BotFather
Next, you’ll create your Telegram bot using BotFather, the official bot for managing Telegram bots.
I. Open Telegram and Chat with BotFather
Search for “BotFather” in Telegram and start a conversation.
II. Create a New Bot
Type /newbot and follow the instructions:
- Name Your Bot: e.g., SolanaTraderBot.
- Choose a Username: Must end with “bot” (e.g., SolanaTraderBot).
III. Copy Your API Token
BotFather will send you a message containing your API token. Copy this token – you’ll need it for your bot configuration.
IV. Set a Profile Picture
For a professional look, type /setuserpic and follow the instructions to upload an image for your bot

3. Create a Virtual Environment in VSCode
Creating a virtual environment helps manage your project’s dependencies without affecting your system-wide Python installation.
Steps:
- Open your project folder in VSCode.
- Open the integrated terminal (press Ctrl+` or go to View > Terminal).
- Create the virtual environment:
python -m venv venv
- Activate the virtual environment:
- On macOS/Linux:
source venv/bin/activate
-
- On Windows:
venv\Scripts\activate
4. Install the Required Libraries
Install the necessary libraries by running the following command in your terminal:
pip install requests base58 solana python-telegram-bot==20.11.1

5. Paste and Configure the Bot Code
Create a new file in VSCode called telegrambot.py and paste the complete bot code from our GitHub repository.
Important: Update the following configuration values in the code:
- TELEGRAM_BOT_TOKEN: Replace with the API token you received from BotFather.
- SOLANA_RPC_URL: Enter your preferred Solana RPC endpoint (e.g., our free RPC).
- CHAIN_ID: This is set to “solana” by default.
- DEX_WALLET_STR: (Optional) Replace with a valid dummy wallet address to simulate transactions.
For the complete code, visit our GitHub repository: https://github.com/gsnode/solana-telegram-trading-bot/
6. Run the Bot
Open the terminal in VSCode and run the following command:
python telegrambot.py
The bot will start polling for updates. Open Telegram, search for your bot by its username, and you will see the main menu with interactive buttons.

7. How the Bot Works
This section explains each command and feature of the bot:
1. /start
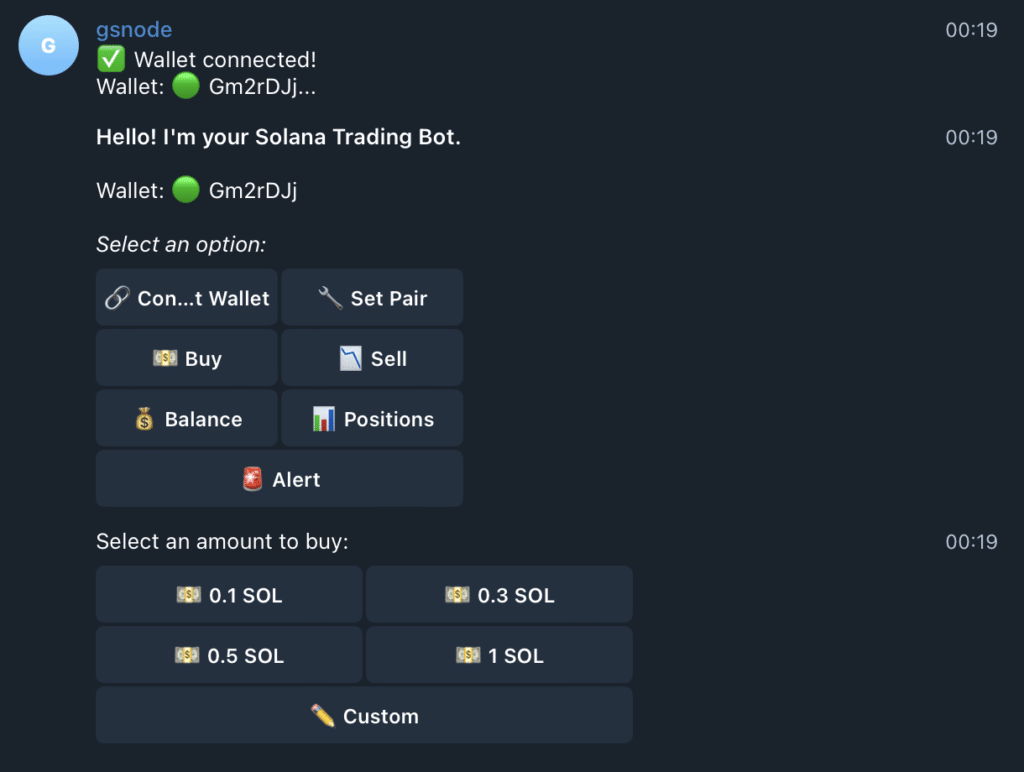
Purpose: Initializes the bot and displays the main menu with options.
Functionality: The main menu includes buttons for Connect Wallet, Set Pair, Buy, Sell, Balance, Positions, and Alert.
2. /connectwallet
Purpose: Connect your personal Solana wallet to the bot.
Functionality: You can either type /connectwallet <your_private_key> or tap the “Connect Wallet” button. The bot prompts you to enter your private key (in Base58 format) and, once connected, updates the main menu with a green wallet icon.
3. /setpair
Purpose: Set the token pair (DexScreener token address) you want to trade.
Functionality: Enter /setpair <pair_address> or use the “Set Pair” button to input the token pair. The bot stores this information and uses it for fetching price data and associating your trading positions.
4. /price
Purpose: Retrieve and display the current price of the selected token pair, along with the token icon if available.
Functionality: The bot calls the DexScreener API to fetch real-time data and sends you a formatted message with the price. If an icon is available, it also sends a small image to enhance the UI.
5. /buy
Purpose: Execute a buy transaction.
Functionality: The /buy command displays a grid of inline buttons with fixed purchase amounts (e.g., 0.1 SOL, 0.3 SOL, etc.) and a “Custom” option for manual input. After execution, the bot confirms the purchase with a transaction signature.
6. /sell
Purpose: Execute a sell transactionA signed data packet that contains instructions to transfer … More.
Functionality: The /sell command displays fixed sale amounts, a “Custom” option, and a special “Sell All” button that sells all tokens for the current pair. The bot confirms the sale and clears the positions if necessary.
7. /balance
Purpose: Check your wallet balance.
Functionality: The bot fetches your wallet balance via Solana’s RPC API and displays your wallet address along with your current SOL balance.
8. /positions
Purpose: Display your open positions for the token pair you have set.
Functionality: The bot filters your positions based on the selected pair and shows details such as purchase amount, price, transaction signature, timestamp, and profit/loss (PnL) for each trade.
9. /alert
Purpose: Set up a price alert.
Functionality: Use /alert <price> to specify a threshold. The bot monitors the price and sends you a notification when it exceeds the set value.
How the Bot Handles Interactive Flows
Inline Keyboards
The bot uses inline keyboards for the main menu and trading commands, allowing you to interact without typing commands manually.
State Management
It uses user-specific context flags (e.g., awaiting_connectwallet, awaiting_setpair, awaiting_buy_custom, and awaiting_sell_custom) to manage multi-step flows and process your responses correctly.
Dynamic Content
The bot retrieves real-time data from the DexScreener API. For example, when you check the price with /price, it displays both the token price and its icon (if available), enhancing the visual experience.
Final Thoughts
This guide has walked you through every step of building a professional Telegram trading bot for Solana. We covered:
- Installing VSCode and Python: Setting up your development environment.
- Creating Your Bot with BotFather: Obtaining your API token and setting a custom profile image.
- Setting Up a Virtual Environment: Creating and activating a virtual environment in VSCode.
- Installing Required Libraries: Using pip to install dependencies.
- Configuring and Running the Bot: Pasting the code, updating configuration values, and running the bot from your terminal.
- Using the Bot: Connecting your wallet, setting a token pair, executing buy/sell orders (including “Sell All”), checking your balance and positions, and setting price alerts—all with a sleek, interactive interface.
- Enhanced UI Elements: The bot uses inline keyboards, Markdown formatting, emojis, and dynamic images to create a user-friendly experience.
If you have any questions or need further assistance, feel free to leave a comment or open an issue on our GitHub repository.
For the complete code and updates, visit our GitHub repository: https://github.com/gsnode/solana-telegram-trading-bot/
Happy trading and coding!
Ale Watters
Engineer. CEO of GS Node. Marketing Manager at Smithii.
Tags:
SolanaArchives
Categories

